Milk Pita Bread Recipe
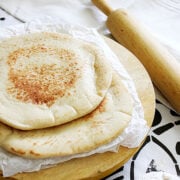
Milk pita bread is a soft pita bread with milk that you can make on the stovetop. Serve it with your favorite gravy or curry, or use it to make your favorite sandwich. The best part is that it freezes well, and once thawed and reheated properly, it will taste just like freshly made pita bread.

There is no milk in the authentic pita bread recipe, but many are used to Lebanese pita bread that’s too thin but soft.
Adding milk to the dough made this non-traditional pita soft, like how the Lebanese make it, and it tastes great, too. The Egyptian pita bread, although delicious, is a little on the chewy side. The milk pita bread recipe I am sharing today gives you the best of two worlds.
What Makes Milk Pita Bread Different?
- Soft and delicious: Adding milk not only makes the bread fluffy and tender but adds richness.
- Easy to make: This recipe is really easy to make, whether you use a stand mixer or by hand. Kneading the dough with your hand should take 5 to 7 minutes.
- Fresher, better texture: I have tried a few store-bought pita breads in the USA. The flavor is not great, and at times, it leaves an unpleasant aftertaste. The texture has nothing to do with pita bread.
- Customize: You can add your favorite herbs or even seeds to the dough and make it tastier for your family.
- Cost-effective: Making pita bread at home is cheaper, and you can make a big batch and freeze it to enjoy later.
Ingredients You’ll Need
- All-purpose and whole wheat flour: You can use only all-purpose flour, but I have mixed the two to give my bread a hint of nutty flavor.
- Yeast: Dry active yeast will help the dough rise and make it fluffy and light, I have also added a little baking powder.
- Sugar: Do not skip it, the yeast needs it to feed, wake up, and make the dough rise.
- Warm water and milk: I mixed both milk and water in the recipe to extend the bread’s shelf life while ensuring soft, tender crumbs.

How to Make Milk Pita Bread
Mix the dough
- In a small bowl, mix sugar, yeast, and milk. Keep it aside.
- In a different large bowl, mix the flour with baking powder and salt.
- Add the yeast mixture and mix well. Gradually add the water and knead until you have a soft, smooth dough.
Let it rise
- Cover the dough and let it rise for an hour or an hour and a half.
- Gently punch the dough to remove excess air. Knead for a few seconds and form four equal-sized balls.
Shape and cook
- Dust the working surface and roll out the balls to a 5-inch diameter. Cover the rolled-out balls and let them rise again for 30 to 40 minutes, depending on how cold or hot your kitchen is.
- Place a nonstick pan on the stovetop on medium heat. Place the rolled balls on the pan.
- Flip the bread after 8 or 9 seconds. When the bottom has light brown patches, flip the bread again and gently press the edges to help the bread puff up.
- When the bread is puffed, remove it from the stovetop and cover it to keep it soft.
Tips for Perfect Fluffy Pita
- Measure the flour properly. Fluff the flour first and then scoop it into the measuring cup, and level it by running a butter knife over it.
- Make sure the milk and water are warm but not hot; hot water will kill the yeast, and the dough will not rise.
- You can add regular cooking oil or olive oil.
- Keep the heat on medium and place the rolled dough on the pan. When the pan is hot, the dough will puff; if it is cold, it will not puff.
- When pressing the edges, the goal is not to press hard but gently to allow the steam to spread.
- When you roll out the dough, do not press it down hard with the rolling pin. It’s better to maintain some of the air inside to help it rise faster and puff evenly later.
Variations
- Black seeds: You can add black seeds to the dough to give it a crunch and a nice aroma.
- Sesame seeds: Spray the rolled dough with a little water before placing it on the hot pan and sprinkle with sesame seeds.
- Add herbs: You can add chopped coriander or mint leaves to the dough.
Serving Suggestions for Milk Pita Bread
- pillowy pita pockets: Fill the pita bread with your favorite sandwich ingredients such as grilled chicken, Arabic falafel, and veggies.
- Hummus Dip: Cut the pita into wedges and use them to scoop up creamy hummus.
- Greek Gyros: For a classic Greek sandwich, stuff the bread with thinly sliced gyro meat or grilled lamb, along with fresh tomatoes, onions, lettuce, and tzatziki sauce.
- Shawarma Wraps: Wrap the shawarma meat with pickles, tomatoes, onions, and toum sauce in warm pita bread.

FAQs about Milk Pita Bread
Either you have rolled it out too thin, or the pan is not hot enough.
Yes, knead the dough, cover it, and place it in a large container in the fridge. It will take its time to raise, and you can use it the next day.
Yes, use 1 and a half cups of all-purpose gluten-free flour.
HOW TO STORE
- On the countertop: Place the bread in a Ziplock bag and keep it on the kitchen counter for a day.
- Freezing: Place parchment paper between each slice of bread and then put it in a freezer-friendly bag. Freeze for up to 4 months.
- To reheat frozen bread: Pop the frozen bread in the microwave for a minute, flipping halfway. Place the frozen bread in the oven for a few minutes.
⭐ PLEASE RATE AND REVIEW
If you have tried this recipe and liked it, please give it a 5-star rating and leave a comment below with your experience!
Soft Milk Pita Bread
Ingredients
- 1 cup all-purpose flour
- ½ cup whole wheat flour
- 2 ½ teaspoon yeast
- ¼ teaspoon baking powder
- ½ teaspoon salt
- 1 tablespoon sugar
- ¼ cup warm water might need more
- ⅓ cup warm milk
- 2 tablespoon cooking oil
Instructions
- Add the milk, sugar, and yeast to a small bowl and mix well. Cover the mixture and set aside for 10 minutes.
- In a separate bowl, add the flour, salt, and baking powder, whisking well to combine.
- Pour the yeast mixture and oil into the flour and knead. Gradually add the water and knead until you get a smooth dough. The dough shouldn’t be sticky.
- Cover the bowl with plastic wrap or a wet cloth and let the dough double in size in a warm place. Depending on how hot or cold your kitchen is, this may take an hour to an hour and a half.
- Make four equal-sized balls out of the dough. Dust the working surface with flour. Roll out each ball with a rolling pin into a 5 – 6-inch circle.
- Place the rolled-out balls on the flour-dusted counter, cover them with a cloth, and allow them to rest for 20 minutes.
- Place your nonstick flat pan on the stove, on medium heat. Place the rolled ball on the pan, and flip the bread after 9 seconds.
- When the bottom of the bread forms light brown patches, flip it again. Gently press around the edges using a spatula; this will help the bread to puff up.
- When the bread is completely puffed, your pita bread is ready. Cover the bread to keep it soft.
Notes
- Measure the flour properly. Fluff the flour first and then scoop it into the measuring cup, and level it by running a butter knife over it.
- Make sure the milk and water are warm but not hot; hot water will kill the yeast, and the dough will not rise.
- You can add regular cooking oil or olive oil.
- Keep the heat on medium and place the rolled dough on the pan. When the pan is hot, the dough will puff; if it is cold, it will not puff.
- When pressing the edges, the goal is not to press hard but gently to allow the steam to spread.
- When you roll out the dough, do not press it down hard with the rolling pin, it’s better to maintain some of the air inside to help it rise faster and later puff evenly.
One of the prettiest pita bread I have ever seen, Muna. I like that you have added wholewheat into this classic white bread. Thanks for the tip on how to make puffy pita. Gotta try this next time.
Thanks Angie, I love this version of pita bread more than any other, since it has a hint of sweetness and soft in texture!
I’ve never made pita bread, but I’d love to. Thanks for the recipe!
Hi Jeff, thanks for stopping by. I’m sure you’ll like this homemade version better, and knowing you, you might make them taste even better.😊